|
Early Anglo-Saxon Clothing
Lesson #5: Page 9
Jewellery, Footwear and
Accessories: Making Simple Jewellery.
 Below
are details of how to make a few types of basic jewellery annular brooches,
wrist-clasps, strap-ends and buckles. The principles
shown for these can be applied to some of the other items of jewellery
too if youre feeling ambitious, such as belt-mounts, girdle hangers, simple
disc brooches, etc. The tools needed are fairly basic, and
the instructions assume a basic knowledge of their use. Below
are details of how to make a few types of basic jewellery annular brooches,
wrist-clasps, strap-ends and buckles. The principles
shown for these can be applied to some of the other items of jewellery
too if youre feeling ambitious, such as belt-mounts, girdle hangers, simple
disc brooches, etc. The tools needed are fairly basic, and
the instructions assume a basic knowledge of their use.
The materials needed are generally brass/bronze
and iron/steel in sheet and wire form. This may be available
from hardware stores, although I usually find model shops that carry model-engineering
supplies are the best source. You will also need small iron
tacks (carpet tacks), a few iron nails and brass or steel rivets (NOT the
two part rivets).
Tools
Hammer
Files (Needle and/or warding)
Drill
Snips
Pliers
Vice
Propane burner (plumbers type, available
from most hardware stores)
Punches (see below)
Scriber
Hacksaw
Useful tools, but not essential
Angle-grinder
Soldering iron
Small anvil
Making Simple Punches
Many pieces of Anglo-Saxon metalwork
were decorated with punched or stamped decoration. The punches
are easily made by getting cheap nail-punches or centre-punches from a
hardware shop. You can use a simple centre-punch for dots and
other shapes can be made by grinding the desired shape on the tip (again,
the angle-grinder with a sanding disc works well, as does a bench grinder,
or simply patience and a hand file). For the crescent shaped
punch-marks often seen an annular punch is used at an angle.
You now have a simple punch.
If you have access to a good gas torch
this job can be made easier by heating the tip to a dull red and allowing
it to cool slowly. Once you have shaped the tip it can be re-hardened
with the torch by re-heating up to a straw colour (a change in the surface
colour, not glowing) and then quenching in oil.
To actually stamp the design place the
brooch on a hard metal surface (The flat back of a vice, a piece of old
railway track or a small anvil all work well), place the tip of the punch
on the brooch and tap lightly with a hammer and there you have your punched
decoration. If you wish to make a raised boss, place the item
face down on a piece of wood and use the centre punch from the back.
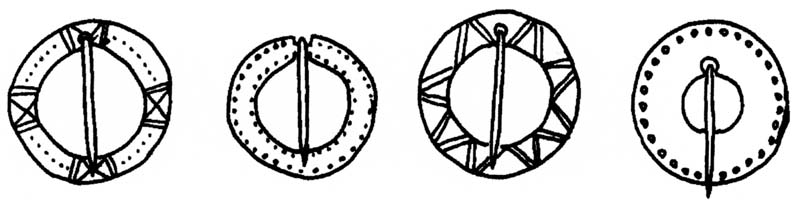
Annular Brooches
Annular brooches remained in use throughout
the Pagan Anglo-Saxon period, and although many were cast, a large number
were simply made from sheet material. This is very fortunate
for us, as these simple sheet metal brooches may be made easily and cheaply.
Annular brooches were usually used in pairs for fastening the womans gown.
The annular brooch consists of a flat
ring with a hinged pin across the central hole. The fabric
is pulled through the hole then pierced by the pin. The sheet
metal variety of annular brooches are generally around 3-6cm in diameter,
with the ring being about 1-1½cm wide. They are usually
about 1-1½mm thick, although a few are as thick as 3mm.
Decoration usually consists of punched dots (round, annular or triangular)
and/or scored lines.
To make your annular brooch:
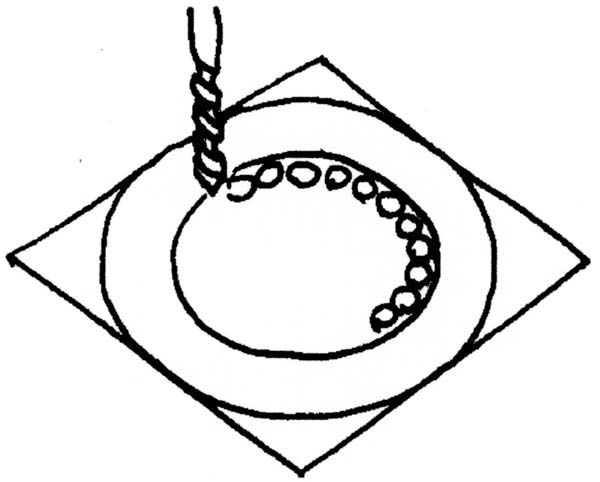
Take a piece of bronze/brass sheet
of the appropriate size and mark two circles, one inside the other.
If you are making a pair, fixing the two sheets together with double sided
tape works well (Im pretty sure this is not how the Anglo-Saxons did it,
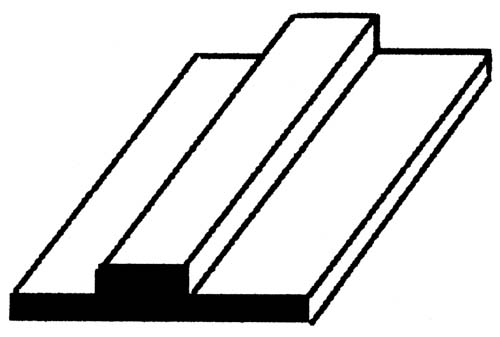
but it works!) Once you have marked out the shape, remove the
centre by drilling a series of holes (as shown in fig. 2.) and then clean
the hole up with a file. The outside curve can be shaped by
cutting with tin-snips, filing or grinding (I would recommend an angle-grinder
fitted with a sanding disc for this job). Having got your basic
ring, either drill a hole or file a notch for the pin.

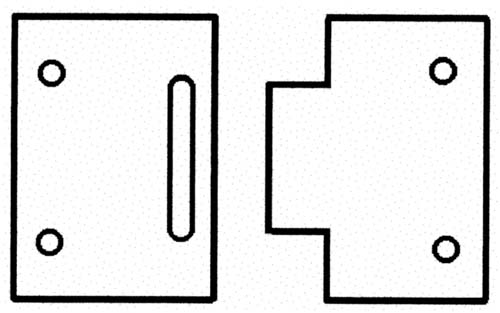
|
|
Fig. 2:
Removing the center section.
|
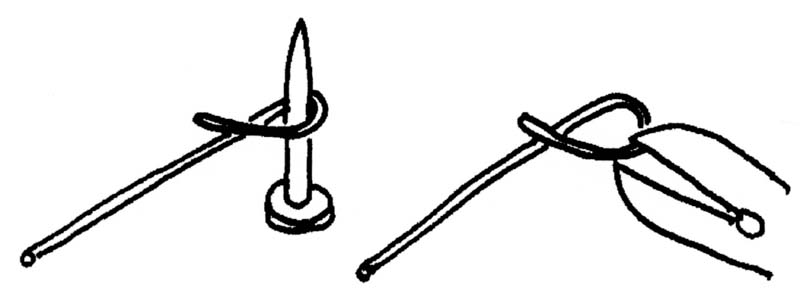
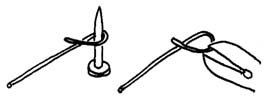
To make the steel pin, I would suggest
thick piano wire. Make the pin by winding the wire around
a nail, then snip it off as shown in fig. 3. Grind or file
a point onto the pin.
|
|
Fig. 3:
Wind pin around a nail and then remove excess wire.
|
You will probably find it easiest to
decorate the brooch before fitting the pin. Simple straight
lines can easily be made with a scriber or the edge of a small triangular
file. Stamped dots, triangles and rings, etc. can be
added with a simple steel punch. When you have finished decorating
the brooch, polish it and fit the pin. This is best done by
pushing the pin through the hole (or over the filed notch) from the back,
then using a pair of pliers to close the loop of the pin tightly.
And there you have it, your first Anglo-Saxon annular brooch.
Dont worry if your first attempt seems a little crude or uneven, many
of the originals were too, and of course it doesnt take much practice
before you start getting much neater results.
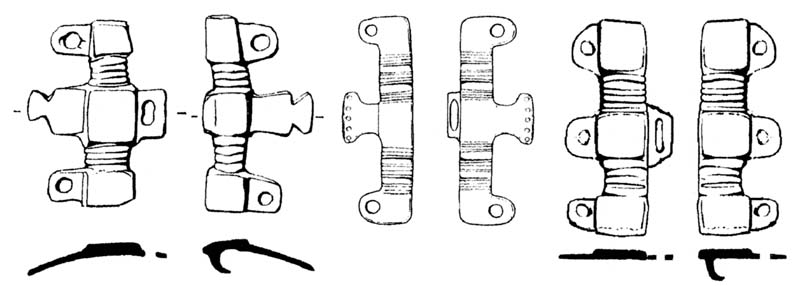
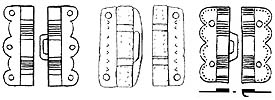
Wrist Clasps
Wrist clasps are one of the distinctive
items of Anglian womens dress in the pagan Anglo-Saxon period, and although
many were cast, many were simply made from sheet material.
To make your wrist clasps:
|
|
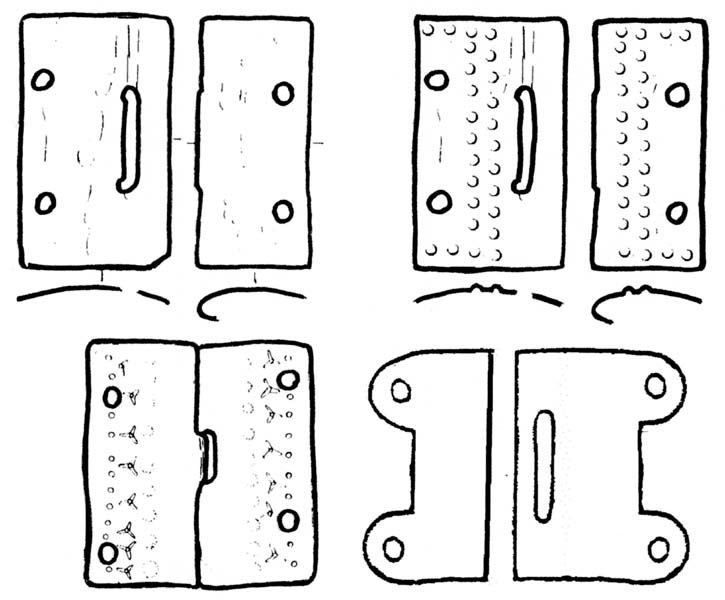
Fig. 5
|
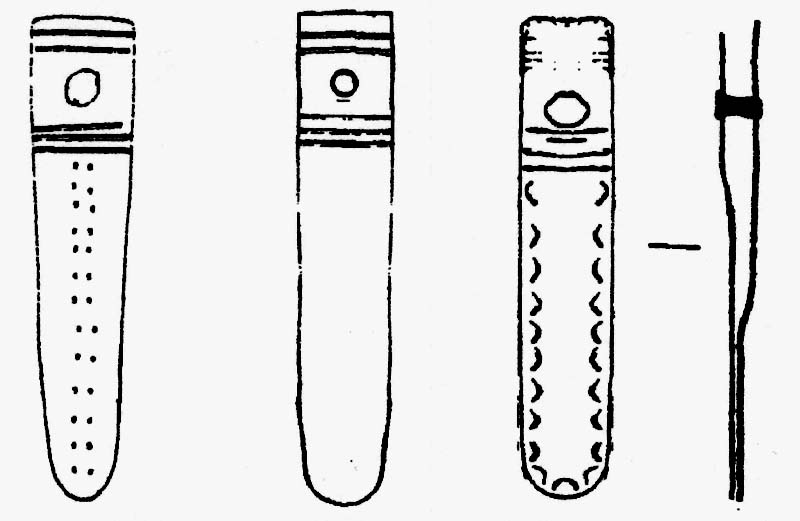
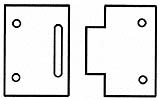
1. Take a piece of bronze/brass
sheet of the appropriate size, ½-1mm thick, and mark it out as shown
in fig. 5. This type of clasp is generally between 25 and 40mm
long and 15 to 35mm wide. Cut out the basic shape with snips.
2. To make the slot drill
a series of small holes along the length of it then clean the hole up with
a file. At this stage you should also drill the holes at the
back edge which allow it to be sewn to the garment.
3. The plates can now be
decorated. Simple straight lines can easily be made with a
scriber or the edge of a small triangular file. Stamped dots,
triangles and rings, etc. can be added with a simple steel punch.
The back edge is also often filed into decorative curves or triangles (see
figs. 4, 6 & 7 for ideas).
4. When viewed end on the
clasps were usually slightly curved. To get this curve, gently
bend
it around a tin can or other curved object. If necessary gently
tapping it with a wooden or rubber mallet will help.
5. Finally, bend the tag
to shape and file off any rough edges.
And there you have it, your first Anglian
wrist-clasps. Dont worry if your first attempt seems a little crude or
uneven, many of the originals were too, and of course it doesnt take much
practice before you start getting much neater results.
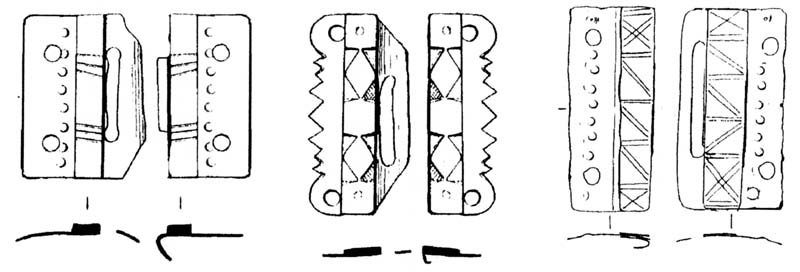
The next step
|
|
Fig. 6:
Sheet-metal wrist-clasps with applied decoration.
|
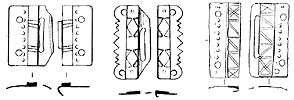
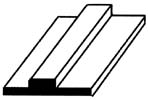
Once youve mastered the basics, you
might like to try a slightly more complex version. Many of
these clasps had a strip of applied decoration on them. This
is one of the commonest types of wrist-clasp and is very straightforward
to make. Follow steps 1-3 as above. Then, to make
the applied decoration, simply cut a strip the same length as the clasp
and about 4-6mm wide. This may be the same thickness as the
clasp itself, but more usually were somewhat thicker (about 1½-3mm
thick). Decorate this by filing and punching (as above) and
when it is finished, solder it in place along the leading edge of the clasp.
Once this is done, finish it off as above.
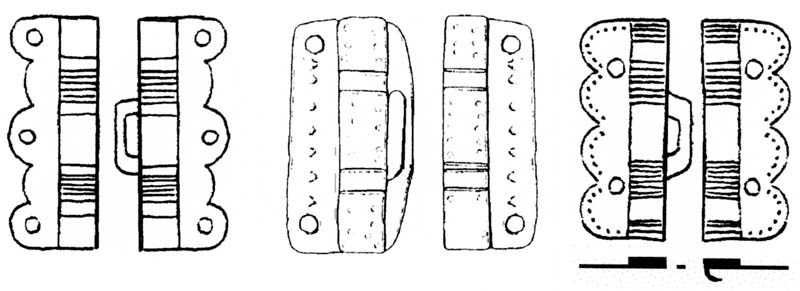
|
|
Fig. 7:
Sheet-metal wrist-clasps with applied decoration.
|
Even more advanced
|
|
Fig. 8:
'E' shaped wrist-clasps.
|
Another fairly common type of wrist
clasp was the E shaped variety. These are a little more complex
to make, but still not difficult. For this you will need thicker
brass/bronze, approximately 2-3mm thick.
1. Cut a rectangle of the
appropriate size. Youll need a hacksaw to do this.
2. File or grind it to
the section shown in fig. 9.
|
|
Fig. 9
|
3. File the tags to shape
and then file in the decorative grooves.
4. Drill out the slot and
the holes for attaching it to the dress.
5. Make the hook from a
small piece of sheet, solder it to the clasp and bend it to shape.
So there you have three different types
of wrist-clasp of varying levels of complexity, but all possible to make
with basic tools.
Strap-Ends
Strap-ends formed a fairly common part
of Anglo-Saxon dress, and although many were cast, many were simply made
from sheet material.
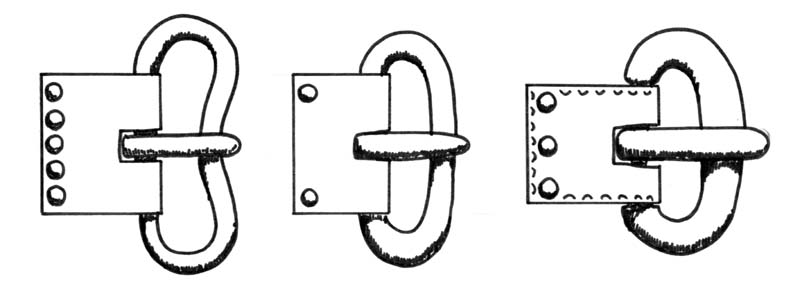
To make your strap-ends:
1. Take a piece of bronze/brass
sheet of the appropriate size, ½-1mm thick, and mark out two tongue-shaped
pieces (see fig. 10). This type of strap end is generally between
25 and 55mm long and between 8 and 15mm wide. Cut out the basic
shape with snips.
2. If you are going to
decorate the strap end, take one of the pieces and decorate it by filing
and punching, then make sure the reverse is smooth by filing/sanding.
3. Solder the two plates
together, leaving the top unsoldered to create a split. The
length of this split varies, usually being about 10-15mm, although in some
cases the split can be more than half the length of the strap end.
Once it has been soldered drill a small hole to allow it to be riveted.
4. Clean up any rough edges
with a file, and then carefully open the split a little. Place
the end of your belt/strap into the split, squeeze the strap end to close
it onto the belt, then secure it with a small rivet (a small carpet tack
mages a good rivet for this purpose).
And there you have it, your first strap-end.
Dont worry if your first attempt seems a little crude or uneven, many
of the originals were too, and of course it doesnt take much practice
before you start getting much neater results.
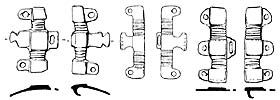
Buckles
Anglo-Saxon buckles come in many shapes
and sizes, with many variations through the period. Luckily,
one of the simplest types with a simple oval loop and plate remained in
use throughout the early Anglo-Saxon period.
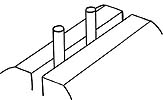
To make your buckle:
|
|
Fig. 12
|
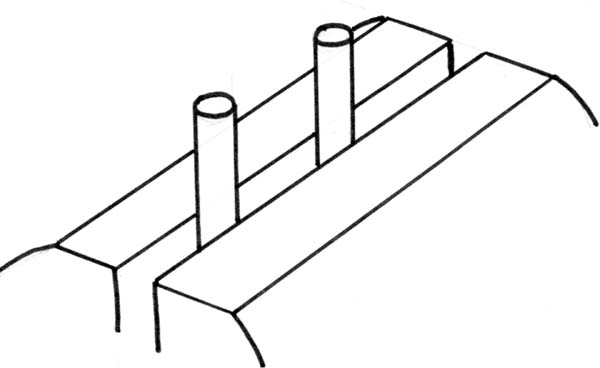
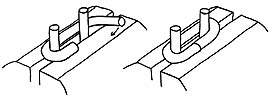
1. Place two nails or metal
rods in a vice as shown in fig. 12. The size of the rods and
their spacing depends on the size of buckle you are intending to make.
2. Take a piece of iron/brass/bronze
rod somewhat longer than twice the length of the distance across the two
rods from step 1. The diameter of this rod should be in proportion
to
the size of the buckle (see fig. 11 and the photographic examples to get
an idea of these proportions). For larger buckles it is an
idea to narrow the ends slightly. This can be done by filing,
grinding or hammering (or if you are feeling brave, by clamping the rod
in a drill and using it as a simple lathe).
|
|
Fig. 13
|
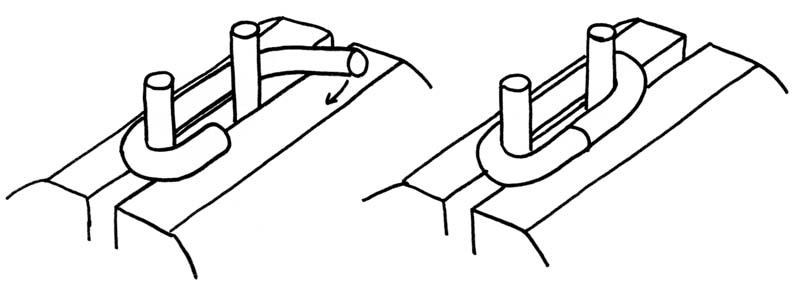
3. Heat the rod and while
it is still soft, bend it around the two rods as shown in fig. 13.
It is easiest to do one end at a time. If you find the two
ends overlap, do not worry, simply trim them with a hacksaw the finish
aligning them. At this sage you might wish to bend the leading
edge to make a kidney-shaped loop. You can also solder (or braise
or weld, depending how adventurous you are feeling) the ends together at
this stage if you wish.
4. To make the pin take
a piece of rod or a nail (even on bronze buckles iron pins were often used).
You can flatten the back by filing to produce a half-round section, or
hammer the whole thing to produce a flat-sectioned pin. Whichever
method you use, flatten one end of the pin completely, then bend this around
the back shank of the buckle. If necessary, cut the front end
of the pin to length and clean up any rough edges with a file.
5. To make the buckle plate
take a strip of bronze/brass/iron sheet (it need not be the same material
as the buckle-loop) the same width as the belt and fold it in half.
Folding it around a shank of similar diameter to the buckle is sensible.
File a slot halfway along the folded edge for the pin to pass through.
The plate can now be decorated if you wish. Simple straight
lines can easily be made with a scriber or the edge of a small triangular
file. Stamped dots, triangles and rings, etc. can be added
with a simple steel punch.
6. Fit the plate over the
pin and around the buckle-shank. To fix it to a belt put the
end of the belt between the two halves of the buckle-plate and then drill
and rivet it in place. The number and arrangement of rivets
varies considerably.
And there you have it, your first Anglo-Saxon
buckle. Dont worry if your first attempt seems a little crude
or uneven, many of the originals were too, and of course it doesnt take
much practice before you start getting much neater results.
 
Page
1 | Page 2 | Page
3 | Page 4 | Page
5 | Page 6
Page
7 | Page 8 | Page 9 | Page10
| Page 11 | Page 12
Bibliography
|