Elizabethan Petticoats
by Drea Leed
What's a petticoat?
In 100 words or less, a petticoat is:
- Usually a skirt with a sleeveless, front-lacing bodice; sometimes a separate skirt tied to a bodice with points, and sometimes a skirt with a sleeved, front-lacing bodice.
- Usually red, especially for the lower and merchant orders.
- Usually closed with lacings, though there are a few references to petticoats closing with hooks and eyes. Some petticoats had placards pinned or fastened across the lacings in front.
- Made of wool or silk fabric; no references to linen or fustian petticoats have been found.
- Frequently had bodices and skirts of different colors and fabrics.
- were often lined or interlined with stiff fabric, like fustian or buckram, for support.
- Until the 1580s, were the primary garment (alongside the kirtle) used for supporting the bosom and achieving the period, flat-fronted silhouette.
The word "petticoat" meant many things in the sixteenth century. For the first half of the century it referred to a waistcoat-style garment worn underneath outer garments for warmth. From the 1550s on, however, it referred to a garment worm by women under their gowns.
There are a good deal of written references to petticoats, though to date no extant examples have been found dating to before 1600. Here's what we know:
We are used to thinking of a petticoat as a type of skirt. In the sixteenth century, however, this wasn't always the case: the petticoat was a skirt, but it was often attached to a bodice that (in England, at least) laced up the front. Cotgrave, in his 1611 dictionary, defined the french gonelle as "a whole petticoat; the bodies and skirts being joyned together."
There are references in Elizabethan times to "petticoats without bodies" (that is, petticoat skirts without bodices attached), and in Queen Elizabeth's wardrobe accounts and other wardrobe accounts, inventories and tailors bills of the time, petticoats are described as having bodices more often than not. In some cases, a petticoat had sleeves as well; there are references in late 16th century wills to "2 petticoats, 1 sleeves, 1 unsleeved","my workingday petticoat lacking sleeves", and "my russet petticoat with sleeves".
Some petticoats had a placard of fabric in the front to hide the lacings beneath. Queen Mary had petticoats like this:
a peticoate of crymsin satten lyned with red kersey, the bodies and placarde lyned with lynen clothe garded with Crymsen veluett stitched all over with crimsen silke
as did Queen Elizabeth:
for making of Twentie flappes of satten & taphata for Petycoates of sundry colors lyned with sarceonett.
Unfortunately, images of petticats are hard to find. They were worn under gowns and rarely depicted in art. Only "strumpets" wore them visibly. Even so, There are some pictures from just past the turn of the 17th century that give insight into what petticoats looked like: Trevilian's Commonplace Book of 1608 depicts a woman wearing what appears to be a petticoat with bodies over a smock, and Francken's "Witches' Kitchen" of 1610 shows a very similar garment.

This nagging houswife wears a petticoat with bodies, partlet and apron.
Commonplace Book of Thomas Trevilian 1608.
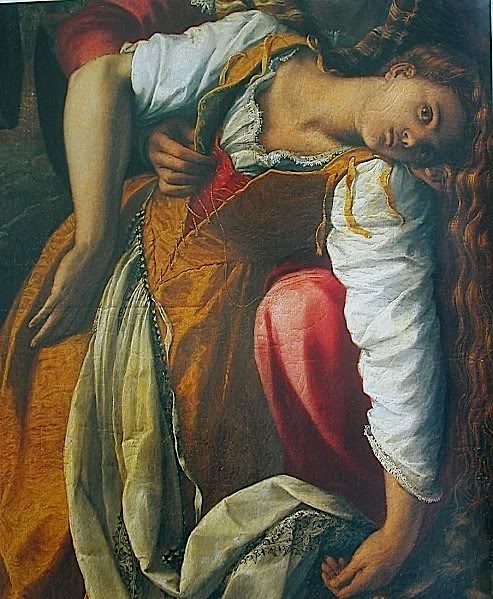
This woman wears a tawny petticoat with a red stomacher beneath. Detail from San Fiacre healing the sick by Alessandro Allori, c. 1596

Two women wear petticoats that lace up the front; one woman appears to have a skirt or under-petticoat under her petticoat.
Detail from the Witches' Kitchen by Francken, c. 1610.
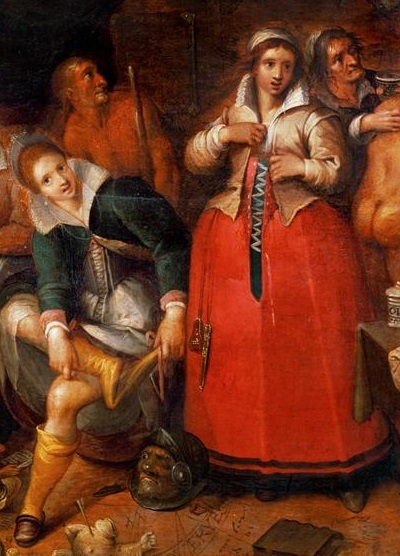
This servant wears a red petticoat with a green stomacher beneath it and sleeves pinned to the shoulder straps. Lucas de Heere, c. 1570
Hariot's 1588 Briefe and True account of the New Found Land of Virginia likens native american dress to a petticoat--"Their woemen wear apparelled after this manner, butt that their apparell was opne before the brest, and did fastened with a little lesse, as our woemen doe fasten their peticott." The image accompanying this illustration does indead bear some resemblance to the front-laced petticoats of England and elsewhere.
Native American woman wearing a "petticoat-like gown". A Briefe and True account of the New Found Land of Virginia by Thomas Hariot, 1588.
Some petticoats were gathered at the waist, and some were simply gored with few gathers. As the century drew to an end, gathered petticoat skirts became the norm.
Petticoats frequently had bodices of different color and materials from the skirts. THe petticoat skirts themselves, however, were almost universally red...particularly the petticoats worn by the poor and the merchant classes. Poor people wore petticoats of red flannel, red frizado, red kersey, and other cheaper wool fabrics; the rich wore petticoats of fine red wool. Queen Mary owned a petticoat of red scarlet--scarlet being the most expensive red woolen fabric available at the time--with a red taffata bodice.
Mary Queen of Scots and her ladies had several petticoats, known as a "wylie-coat" in Scots english. They were also red, had bodices attached, and were made from a variety of woolen and silk fabrics:
- for tua elnis and ane half scarlot to be hir ane wyle cote (1544) Accounts of the Lord High Treasurer, Vol VIII
- tua elnis and ane half reid stemming to be hir ane vylecote (1552) Acct L. H. Treas. Vol X
- Item, five elnis reid unwatterit champlat to be ane pittecote to my Lady Jene....quarter and a half quarter walwote to bordour the same....ane elne of canves to the bodyes of the same (1552) Acct L. H. Treas. Vol X
- vi elnis reid unwaterid champlat to be hir (the queen) ane vylecote... for canves to line the bodyis of the same...for furring of ane vylecote of reid unwaterit champlat to hir, with quhite lamb skinnes (1552) Acct L. H. Treas. Vol X
All of the petticoats in Thomasine Petre's wardrobe (c. 1555) were described as red pettiocats, made of varying types of fabrics:
- For a yard and 1/2 of redd grograyne chamblet for the upperbodies to two peticotes
- for one yarde qtr of scarlet for a peticote
- for a yarde & a qtr of redd clothe for a peticote
- for makinge a peticote of skarlet
- for making a peticote of redd clothe lined wth lynen clothe
Queen Mary Tudor's wardrobe accounts (PRO doc LC 5/31) also mentioned a plethora of red petticoats:
-
a peticoate of crymsin satten lyned with red kersey, the bodies and placarde lyned with lynen clothe garded with Crymsen veluett stitched all over with crimsen silke
- a Peticoate of Scarlett garded with crimsen vellvett the garde stitched all on with sylke the upper bodies of Crymsin taffata and lyned with lynen clothe
- two petycoats of crimsin Satten garded with Crimsin veluett styched and whypped one the edge with twiste the skyrte lyned withe red kersey the bodyes and placarde with lynen
Why red? We don't know exactly why, but it is true that during the sixteenth century, red was though to be a warming color, and garments made of that color were thought to warm the body better than others. Shoes were lined with red scarlet fabric, for the same reason. People prone to chill were admonished to wrap themselves in a red garment to stay warmer.
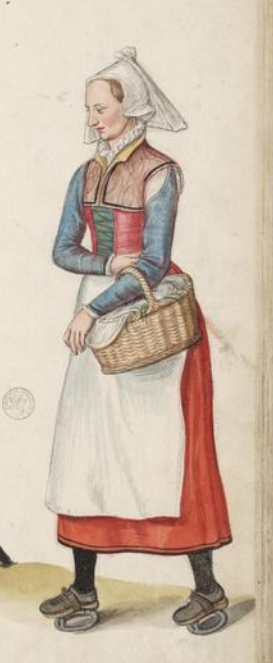
This English countrywoman in London was drawn by Lucas de Heere c. 1570. Note the red visible beneath her outermost layer--a red petticoat, most likely.
The woman wears a red petticoat that laces up the front, underneath a jacket.
Detail from the Witches' Kitchen by Francken, c. 1610.
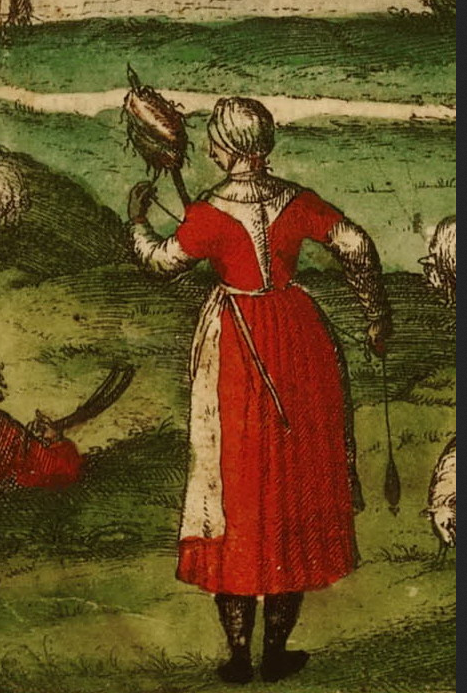
The shepherdess wears a red petticoat over her smock, one with short sleeves.
Detail from Civitates Orbis Terrarum, c. 1586
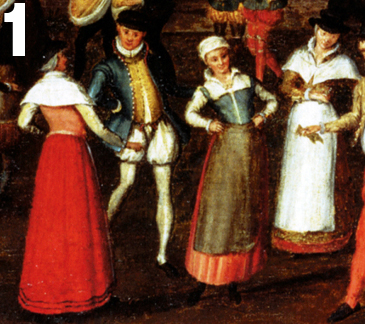
These women were petticoats of a variety of colors: red skirt with tawny bodice, blue bodice with tawny skirt, etc. Detail from Fete at Bermondesdy, c. 1570
Detail from Civitates Orbis Terrarum, c. 1586
There are exceptions to every rule: There were some petticoats without bodices, and not all of them were red. Peasants wore petticoats of russet (a grey wool cloth) and undyed white wool, as well. Queen Elizabeth had petticoats in a rainbow of colors and fabrics: peach satin, crimson-silver brocade, tawny velvet, blue flannel, and more.
Were petticoat skirts lined? It's unknown whether the petticoats of commeners' were, but the petticoats of Queen Elizabeth were lined in a light silk fabric for summer, which was switched out for light flannel linings for winter.
Were petticoats decorated? Some petticoats had bands of trim around the skirt, and some had fringe around the bottom of the skirt as well. Here's a sampling of the petticoats made by Queen Elizabeth's wardrobe, for the queen, her servants and her ladies in waiting:
- A petycoate of crymsen taphata wth Fyve gards of black vellat layd wth syluer Lace lined wth bayes and in the bodies wth Fustyan(1570)
- newe forebodies for a Petycoate of blue Satten striped with golde the bodies lyned with blue sarceonett (1571)
- a payer of bodies of oringe colorid taphata lyned with the same for a Petycoate of oringe color vellat (1572)
- a Petycoate of crymsen tyncell prented, with a peire of bodies of crymsen Satten lyned with crymsen taphata and garded with crymsen Satten enbrauderid with golde (1572)
- for alteringe of a Petycoate of strawe color sarceonett & making a paire of bodies lyned with white sarceonett (1574)
- for lyninge of a peire of Petycoate bodies with grene sarceonett (1574)
- For upperbodyinge of a Petycoate of carnacion satten enbrauderid allover, the bodies lyned with carnacion taphata (1575)
- For alteringe and enlarginge of a peire of bodies for a Petycoate of white Satten (1575)
- for making of eighteene flappes and shoulder peces for Petycoates of sundrye kynds of stuff & sundrye colors (1576)
- a payer of bodies for a Petycoate of grene satten lyned with sarceonett (1579)
- for making of Twentie flappes of satten & taphata for Petycoates of sundry colors
- a paire of bodies of crymsen satten for a petycoate of opall lyned with crymsen sarceonett (1577)
- a peire of bodies for a petycoate of crymsen satten lyned with sarceonett(1579)
- a payer of bodies for a Petycoate of white satten raste allover lyned with white sarceonett (1579)
- a Petycoate of red mockeado striped with copper golde (for her) layed with lase, lyned in the skyrtes with bayes and in the bodies with fustian (1579)
- a Petycoate of fryzeado stamell color for the said woman Dwarf layed with lase, with bodies of crymsen taphata lyned with fustian (1579)
- a Petycoate of carnacion taphata (for her) layed and frengid with grene silke, the skyrtes lyned with bayes and the bodies with fustian (1580)
- a Petycoate of stammell fryzado (for the said dwarf) with bodies of durance, lyned with fustian (1580)
- a payer of bodies for a Petycoate of cloth of silver (1582)
- Two payer of petycoate bodies of satten lyned with sarceonett(1585)
- a Petycoate of chaungeable Duraunce (for her) with thre billement lacs & frengid aboute the skyrtes, lyned in the bodis with fustian & bayes in the skyrtes (1586)
- a payer of Petycoate bodies of carnacion taphata lyned with sarceonett (1586)
- a Petycoate of oringe color & blak figured satten frengid upperbodied with taphata lyned with fustian (1587)
- a Petycoate of chaungeable tufte taphata with two silver laces and frenged aboute the skirtes, lyned with bayes and buckeram to laye aboute the same, the bodies of oringe color taphata (1588)
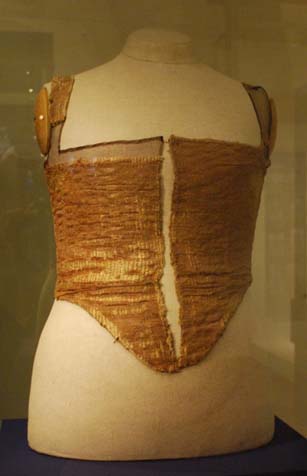
Although there are no English petticoats remaining from the 16th century, there are bodices from elsewhere in Europe that served the same function. Called a "gamurra" in Italy, a "gonnelle" in France and an "unterrock" in Germany, gowns with skirts and a supportive, usually sleeveless bodice were a fixture of late 16th century dress.
The two extant bodices below are examples of such continental "petticoat bodies".
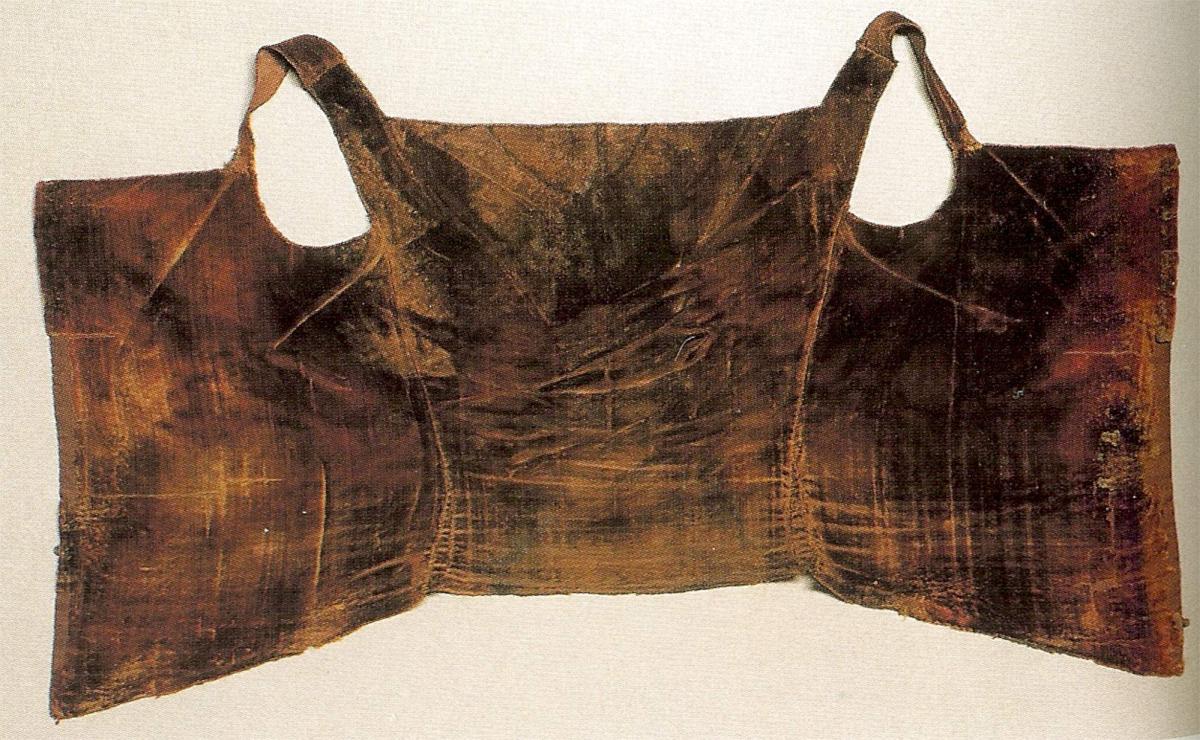
Eleanora of Toledo was buried in a Petticoat with Bodies and a gown. Only the bodice of the petticoat survives; it closed up the front with hooks and eyes and was made of velvet, lined and interlined with linen. Details and reconstruction Here.
A bodice discovered in a well in prague, and dated to the 1560s, also resembles a classic petticoat bodice. the outer fabric was originally a crimson and metal thread brocade--similar to the "tinsel" of the Elizabethan era--and was lined with a dark pink double-woven silk.
For more information on choosing the right
fabric for your skirt, take a look at the article "Period Fabrics for Elizabethan Costuming".
Clothes of the Common Woman 1580-1660 has the most comprehensive analysis of what petticoats were and how they were worn that I've found to date.
You can also Browse the Petticoats in Queen Elizabeth's Wardrobe for inspiration.
Petticoats for Re-enactors: some considerations
When making a petticoat, there are a number of practical considerations to keep in mind.
Do you want a petticoat with a bodice, or simply a skirt? Petticoats with bodies are more versatile: you can wear it alone over a smock and go about your business, rather than needing a separate top to wear with it. In addition, the bodice holds the skirts up. Skirts without bodices have a tendency to slide down or cause uncomfortable pinching, if they are tight.
On the other hand, if you simply want a skirt to show when you kilt up your outer gown, a petticoat skirt may be all you need. It is easier to make a petticoat skirt without a bodice; and a bodice can always be added later when you have time to make one.
What material should you make it from? Many re-enactors spend a day in the hot sun, in summery weather that makes layered woolen garments uncomfortably warm. Unfortunately, there are no references to linen or fustian petticoats; wool was the only fabric mentioned for commoners' petticoats, and expensive wool and silk mentioned for petticoats of the nobility.
If you're standing over a cookfire, wool is good: woolen skirts burn far less easily than skirts of linen or cotton.
Also, If you do make a petticoat of taffeta or satin, a gown worn over it will slide and move more easily over the fabric than over a petticoat of wool.
How should you decorate it? In addition to looking nice, bands of trim or strips of fabric sewn around the bottom of a petticoat help the skirts stand out and give the skirt a nicer shape. Fringe around the bottom can do the same. A band of contrasting fabric around the bottom of the petticoat can be replaced when it gets dirty or worn. If you don't have quite enough fabric for the skirt, the contrasting fabric can also serve to lengthen the skirt and make it long enough.
Some petticoats of the eighteenth century were stiffened with narrow rope cording sewn into channels around the bottom. Although there's no evidence that this was done in the sixteenth century, several re-enactors choose to do this to achieve a full-bodied skirt without using a lot of fabric or a heavy cloth.
How do you make a petticoat?
A petticoat is a relatively easy item to make. It's versatile, too; with minimal changes, this pattern can be used for Cavalier and later 17th century underskirts, as well as for simple gathered overskirts.
Fabric:
The amount of fabric you need depends on your height, waist size, and the amount of fullness you
want in the skirt. 3 to 3 1/2 yards of 45-inch wide fabric products a petticoat with a good amount of fulness to it. At a bare minimum, you will need enough fabric so that the petticoat fits over your hips. 2 yards of 45-inch wide fabric can make a modest petticoat without as much gathering or pleating at the waist.
If you are tall, 45 inch wide fabric may not be long enough to reach your feet. You would either want to use 60-inch wide fabric or buy an extra yard and a half of a contrasting fabric to lengthen the skirt--a very common practice during Elizabethan times.
If you want to make the petticoat reversable, or if you wish to line it with a different fabric, you will need the same amount of lining fabric as you have petticoat fabric.
Directions:
1) Lengthen the skirt (optional)
Before you begin sewing your petticoat together, you need to make sure that the fabric--if it is 45 inches wide--is long enough. Take a tape measure and measure from your waist and down to the ground. If this measurement is less than 45 inches (or if you're using 60 inch wide fabric), you're in luck! You can go on to step 2.
If this measurement is greater than 45 inches, or if you want to put a strip of contrasting fabric on the bottom of your petticoat regardless, you will need
to lengthen the fabric you have using the following method:
Cut a strip of fabric out of a contrasting fabric. The width should be the finished width that you want the strip to be , plus 1 inch. (For example, if you want a 2-inch wide band at the bottom of your skirt, cut out a 3-inch wide strip of fabric; if you want an 8-inch wide band, cut out a 9-inch wide strip. You will need a strip of fabric the same length as your skirt fabric. Most likely you will have to cut out two or three strips, and sew them together to make a strip of the proper length.
Bands of contrasting fabric at the bottom of petticoats during Elizabethan times were called "guards" if they were wide, "welts" if they were narrow, and were very commonly used. Woodcuts and portraits show bands of fabric from 1 inch to 8 inches in width. For simple petticoats worn by servants and the not-so-wealthy, these strips of fabric would have been similar to the material of the petticoat--a linen petticoat would have linen bands, a woolen petticoat woolen bands. If you are making a fancy petticoat, of course, you can make the bottom band of velvet, satin, taffeta, or whatsoever your heart desires.
.
Place the strip of edging fabric and the skirt fabric right sides together, and sew the two pieces together half an inch away from the edge. Iron this seam flat.
2) Sew the fabric into a tube.
Authentinote: Although all extant petticoats and petticoat patterns were slightly flared, it is much easier to make a tube-shaped petticoat. It achieves the same shape. You can if you wish cut two or three slightly flared pieces and sew them together into a flared tube, to make a more authentic petticoat. For a petticoat section 30 inches wide at the top, the bottom would have been, on average, 46 inches.
This step is pretty self-explanitory--match up the raw ends of the piece of fabric, right sides together, and sew them together 1/2 an inch away from the edge of the fabric. Start at the "bottom" of the skirt and stop sewing around 8 inches from the other end. If you have 3 yards of fabric, you should now have a tube 1.5 yds in diameter. If you have a contrasting band of fabric at the bottom of the skirt, you should pin the edges together before sewing them, making sure that the seams where the band meets the skirt fabric match up on either end.
If you are making a lined petticoat, repeat this same procedure with the lining Be sure that the lengths of the lining and the outer fabric are exactly the same, so they will match up without puckers, gathers or excess fabric when they're sewn together.
3) Hemming the Skirt.
Modern skirt-making techniques involve finishing the waistline and then trimming and hemming the skirt so that it is even all the way around. In Elizabethan times and for the next few centuries, the opposite method was used--The hem was finished first, and then the waistline was fitted so that the skirt hem was even all the way around.
- If you are making an unlined petticoat:
This step is easy. Simply turn the bottom edge of your petticoat up on the inside, iron, fold the raw edge under, iron again, and either hand-hem or machine-hem the bottom of the skirt. Although machine-hemming takes much less time, hand-hemming a petticoat gives it a much more authentic look. Whichever option you choose, ironing the hem first is important. If you loathe hemming but want an authentic looking petticoat, you might want to try lining it--no hand-hemming involved.
- If you are making a lined petticoat:
First, you must have the lining as well as the outside of the skirt sewn into tubes (see step 2 above). Make sure that they are the same width around.
Match up the bottom edge of the outer skirt fabric and the lining, right sides together. Sew these two layers of fabric together along the bottom of the skirt, 1/2 an inch away from the edge. Turn the two layers of fabric right side out, and iron the hem seam where they're joined together. Voila! You now have a hemmed and lined skirt. If the lining fabric is nice, this petticoat can even be reversible.
Here's a trick to make a petticoat with a lot of body to it--when you are sewing the bottom of the lining and the petticoat fabric together, lay a thin, folded strip of heavy canvas, duck or drill on top of the seam and sew it to the fabric. When you turn the petticoat right side out and iron it, this strip will make the hemline much stiffer, and help it stand out.
One more step you have to take, if this petticoat is lined--lay the skirt flat, and match up the top edges of the lining and the outer skirt fabric so that both layers are the same length. You don't want the lining bagging or gapping because it's longer than the outer fabric at some points. Baste the two layers together at the top.
4) Find the Waistline.
I generally make my petticoats somewhat shorter than the outer skirts, to keep from tripping on masses of fabric. Ankle length or even lower calf-length is a good length for a petticoat.
If you won't be wearing a bumroll beneath your petticoat, marking the waistline is easy--hold the tube of fabric up to your waist until the hem is at the position you want it, and mark the fabric where it meets your waist. Starting 1/2 an inch above this mark, trim the excess strip of fabric off the top of your petticoat.
If you are wearing a bumroll, farthingale, or some other shaping under the petticoat, the length of the petticoat won't be even all the way around. The following method for evening the hemline is a useful one for the non-mathematically inclined. (Although it is possible to do this alone, it is much easier with a friend or a dress form. )
First, Put on the bumroll, hoopskirt, etc., etc which will be worn under the petticoat. If you have a dress form, put these underpinnings on the form.
Tie a string or ribbon firmly around your middle (or the dress form's middle) at the point where you want the waistline to be. Starting with one side of the 8-inch opening in the petticoat side seam, place this edge at the place where you want the petticoat to fasten (front, side or back) and pull the top of the skirt up underneath this string, gathering it as you go, until all of the skirt fabric is gathered underneath the waistline string. Even out the gathers as much as you can, and then begin pulling the fabric up or down as necessary until the hemline is even. To the right is a picture, taken from Jean Hunnisett's "Period Patterns for Stage & Screen", illustrating this process.
Once you are satisfied that the hemline is even, mark the fabric at the waistline string with tailor's chalk or some other marking tool. Release the string, lay out the fabric, and mark a smooth line as close to the original markings as possible (they will be rather jagged). Trim the fabric 1/2 an inch above this mark.
5) Gather the Waistline.
You can choose to either gather or pleat your petticoat to a waistband. Either knife-pleating (where all the pleats face the same direction) or box-pleating (where pleats face alternate directions) is period. I prefer to pleat my petticoats rather than gathering them, as it enhances the period look of the clothing.
If you really want a petticoat which springs out from the waist, you can cartridege-pleat it instead. Cartridge-pleating is particularly effective with thick fabrics, such as wool, velvet and brocade, and petticoats which have been lined. Thinner fabrics like linen or satin are better off knife- or box-pleated.
Whatever gathering method you choose, you may want to gather or pleat less in the front to keep a flatter line at the stomach; I leave the front six inches of my petticoats ungathered.
You can find pictures of all these pleats and more, as well as more detailed instructions on how to make them, in this Introduction to Pleats.
If you are making a lined petticoat, treat the lining and the outer fabric as one layer at this point.
To gather your petticoat, start 2 inches from the edge of the side opening and run two basting stitches, one 1/4 an inch above the other, 1/4 an inch from the top of the petticoat until you're two inches from the other edge of the side opening. Gather these two rows of stitching together until the top of the skirt is the same as your waist measurement, plus 1/2 to 1 inch (This will be taken up when the edges of the side opening are folded under and finished).
To pleat your petticoat, you can either eyeball the pleats (which is what I do), or measure them off with a ruler. Run a basting stitch over the pleats, 1/3 an inch away from the top edge of the petticoat, to keep them in place. You can also iron the pleats at the top edge of the skirt once they're pinned or basted.
To cartridge pleat a petticoat, take a look at this Short Tutorial on Cartridge Pleating.
6) Finish the side opening.
Before you put the waistband on the skirt, you have to finish the raw edges of the side opening. If your petticoat is unlined, this means turning the raw edges under and hemming them down. If your petticoat is lined, turn the edges of the outer petticoat fabric and the inner lining between the two layers of fabric, and whipstitch the edge where the two layers meet together. This is the time to make sure that the side opening is wide enough that the petticoat can slip over your hips; if not, rip the seam out a little more until it can. Reinforce the bottom of this side opening with stitches so that it won't rip out more.
7) Sew on the waistband/bodice.
This skirt can be used as the skirt of a gown, kirtle or petticoat bodies, as well as a separate petticoat. Constructing an Elizabethan Kirtle tells you how to incorporate it into a dress.
For a petticoat, however, you'll need a waistband. Once the top of the skirt has been gathered or pleated, cut a small band of fabric 1 1/2 inches wide and the length of your waist measurement plus 2 inches.
Place this band on the right side of your petticoat, with the edge of the bandeven with the edge of your gathered or pleated petticoat waistline. Sew the band to the petticoat 1/2 an inch away from the edge. Reinforce this seam with another seam, about 1/8 an inch nearer the edge, and perhaps even a zig-zag stitch between the seam and the edge of the fabric.
Trim the excess fabric off so that 1/3 of an inch of fabric remains between the seam and the top edge of the petticoat. Fold the band over to the inside, fold the end up, and hand-stitch it down using a strong quilting thread. This waistband is going to see some wear and tear every time the petticoat is stepped on, pulled or otherwise stressed, so it's important to make the waistband strong.
Your petticoat is pretty much finished! The waistband is quite small compared to modern standards--no more than a band to finish off the top edge of the skirt--but as it's a petticoat and will be worn beneath a skirt, you don't have to worry about a gap showing between it and the bodice. It also decreases the amount of fabric around your waist. I wear my petticoats slightly below waist level; what with a smock,farthingale, bumroll, petticoat, skirt and gown, I try to keep the waistbands as non-bulky as possible.
You can tie your petticoat together with ribbons at either edge of the side opening, or use (large and sturdy) hooks and eyes for the same purpose. both fastening methods were used during Elizabethan times.
If you want to add some pizazz to your petticoat--and give it more bulk at the hemline--you can stitch rows of cord or applique thin strips of fabric or trim around the bottom. (See the section on "Decorating your Petticoat" above)
Tua elnis and ane half scarlot to be hir ane wyle cote; 1544 Treas. Acc. VIII 326.
vj elnis reid unwaterit champlat to be hir ane vylecote; 1552.3 Treas. Acc. X 156.
For ane elne of reid scarlot, to be Lady Jane ane wyle coit; 1538 Treas. Acc. VII 102.
To be hir ane wylicoit, vij quarteris Inglis reid; 1550.1 Treas. Acc. IX 472.
Ane furrit vylecoit to my Lady Gordoun; 1551 Treas. Acc. X 33.
To rander . to Issobell Alesoun . ane kirtill of mellay claith ane vylecoitt of quhite; 1569 Canongate Ct. Bk. 63.
Tua elnis reid stemyng of Myllane to be hir vylecott and hois; 1553 Treas. Acc. X 183.
To be a wyllicot to my lady twa ells thre quarters of skarlet searge; Acc. Lady Bellenden 1.
Ane ryd wylle coit of gray steming bodyis and lang slevis; 1589.90 Lanark B. Rec. 96.
Twa Scottis scarlot wyliecoittis, estimat to xiij lib.; Pont Cunningham 196.
Ane taffatie gowne and dames wyllicoitt, and ane taffatie wyllicoitt with my sylwir belt; Pont Cunningham 207.
For ane blew lais to .our ladyschip wyllicot & bodyis; 1602 Tailor.s Acc. Bk. A 23.
ij elnis and ane half elne demygrane, to be hir ane vilycoit; 1551.2 Treas. Acc. X 64.
Tway elnis and ane half reid stemmyng of Myllane to be hir ane vilecoit; 1552 Treas. Acc. X 123.
v elnis of chamlot of merkie to be ane wiliecote bodie and slevis; 1562 Treas. Acc. XI 227.
Ane plaidyne welycote vj s. viijd; 1569 Crail B. Ct. 14 June.
I leive to . my sister sone ane reid welicoit; 1593 Edinb. Test. XXV 264.
Twa elnis and twa quarteris quhyte Spanye taffateis to be twa nycht wyliecoittis; 1575 Treas. Acc. XIII 82.
Quheitt grosgrane taffaty to be tua double welycoittis; 1580 Treas. Acc. MS 38.
Ane narrow pece quhyt clayth . to be my lassis weylecottis; 1604 Wedderb. Compt Bk. 45.
That gentill women and burgessis wyffes haid moir gold and silver about thair gown and wylicoat tayles nor thair husbandis haid in thair purses; 1655 Nicoll Diary 168.
Home