|
|

1528 |
 |

1533 |
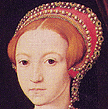 |
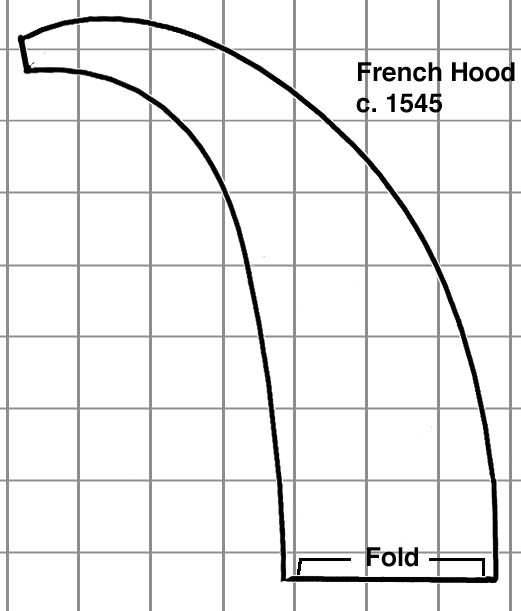
1545 |
 |
1554 |
 |
1565 |
A French hood requires slightly more esoteric materials to make than a flat cap or coif, but the materials are not impossible to find. You will need:
As different computers and printers will print different sizes of the same picture, measure the square-inch grid on the pattern to ensure that it isn't too large or two small. If it is, enlarge/shrink it on a xerox machine or using square-inch grid paper.
Take your french hood pattern and lay it down on your buckram or plastic canvas. Using a marker or tailor's chalk ( a marker is necessary if you're using plastic canvas), trace around the pattern. Cut the buckram along the tracing lines, keeping the edge as smooth as possible.
If you're using plastic canvas, you will need to cut out two more pattern pieces out of flannel or a sturdy fabric and, sandwiching the plastic canvas between the fabric, whipstitch the three together. This will prevent the pattern of the plastic canvas showing through the fabric of the finished hood. If you're using lightweight buckram, cut two or three pattern pieces and whipstitch them together around the edges.
Thread your needle with the heavy buttonhole twist or quilting thread. Starting 8 inches from the end of your millinery wire, place the millinery wire against one point of the buckram base and, using a blanket or buttonhole stitch, sew the wire to the outside edge of the buckram crescent. Once you have reached the point at the other end (Or the squared edge, if you are making an earlier Tudor hood), bend the wire with needlenosed pliers or something similar until it matches the inside edge of the point, and continue stitching the millinary wire to the edge of the buckram.
Continue sewing the wire until you are around three inches from where you began, at the first point. Cut the wire here. Now, taking your pliers, bend the remaining 8 inches of wire (the 8 inches of wire you left free when you started), so that it matches the curve of the point, and begin stitching it along the inner curve of the buckram crescent. You will soon overlap with the first end of the wire. When you do so, lay the millinary wire behind the previously sewn wire, so that the edge is as smooth & unlumpy as possible.
Your stitches should be 1/4 to 1/2 an inch apart. Don't worry about shaping the hood as you sew the wire to the buckram base; you can shape it once it's done. Managing springy wire, tanglesome thread and stiff buckram can be unweildy, but once you get the hang of it, it goes more smoothly. I prefer using silk thread to attach the wire to the buckram frame, as it tends to tangle less. Running the thread along beeswax before sewing with it also helps to reduce both tangles and thread fraying/breakage.
Once you have finished the base, you can now shape it into the shape you want. There are any number of portraits showing different hood shapes on the French Hood Page that you can use for reference. A mistake that many people make is placing the hood too far forward on the head; it is designed to sit just forward of the crown.
Repeat this with the fabric you plan to use for the back of your hood. A common combination is velvet for the front of the hood and satin for the back, unseen side.
Place the two pieces of fabric together and pin them so that they lay flat. Now, starting 1 inch above the point on the outside of the crescent, sew down to the point, all along the inner edge, and 1 inch up the outside of the crescent from the opposite point along the tracing lines. Use a small stitch--this seam needs to be sturdy.
Trim the seam allowance as close as you can, turn the two crescents right side out, and iron. Try to get the two points of the crescent as sharp as you can.
Now, slip this fabric casing over the buckram frame. The points of the frame should fit snugly into the points of the fabric crescent. Pull the upper fabricat the middle of the crescent taught so that the edge goes around the back of the hood, and pull the lining fabric taut, tucking the end under, so that the two fabrics meet just underneath the back edge of the hood.The seam between the two should be at the front edge of the hood. Pin the two fabrics together and continue this process, pinning the two fabrics together along the upper edge, until the entire upper edge of the hood has been pinned and the fabric on both the underside and the top is smooth and taut. The seam between the other fabric and the lining should run evenly along the bottom edge of the hood.
Using a needle and thread, hand-stitch the lining and outer fabric together along the top using a small hemstitch, removing pins as you go.
Check the shape of your hood once you've finished, and reshape it if it's bent out of shape. You now have a basic French Hood.
Measure along the middle of your hood pattern, between the outer and inner crescent edges, from one point to the other. We'll call this measurement A.
Cut out a rectangle of your veil fabric (the dull side of satin fabric is my favorite), 22 inches long and the width of measurement A. Fold all four edges in and hem-stitch them, so that the rectangle is finished on all sides.
Take the side of the veil that is measurement A in length, fold it in half, and match this center point with the center of the french hood. Starting at this point, hem-stitch the veil to the lining of the hood, about 1 inch down from the upper edge. It should stop an inch or so from the end. Finish off, and sew the other half of the veil to the hood.
If you put the hood on now, the rectangle of fabric will create two flares behind your head--very Babushka, not very Tudor. You need to pinch the two sides of the rectangle together, around 6/8 inches from where they re sewn to the hood, and stitch them together at that point. Now, when you place the hood on your head, the stitched-together veil sides will meet at the base of your neck and will add support to keep the hood on your head as well as producing that straight fall of veil seen in all the portraits.
If you have short hair or no luck keeping your hood on, you can try the stretchy comb sewn to the inside of the hood, all the way from one point to the other, in conjunction with a caul if you wish. Or you can sew a strap to your hood-a period solution.
Sew your narrow ribbon to the bottom edge of the hood, an inch or so behind the point. bring it across your chin and measure the distance necessary for it to reach the other point of the hood; cut off the ribbon half an inch longer than this measurement. Fold the end of the ribbon down, and sew a small eye to the end. Sew the corresponding hook to the lining of the hood on the other side. When the strap is hooked on, the hood should stay securely on your head.
When heavy billiments, or jeweled edgings are added to the top of a hood, it does become moere top-heavy. If a heavy fabric is used for the veil, such as velvet, the same thing occurs. In these cases, a chinstrap is a great help.
Find some large pearls, filigree beads, or other metallic or jeweled beads whose holes will allow the millinery wire to fit through snugly. Some decorative Buttons with loops on the back will also work.
Bend one end of the wire up slightly using needle-nosed pliers,or use a hot glue gun to glue the end bead securely into place.Continue threading the beads onto the millinary wire until you reach the other end; bend the wire up, or glue this last bead into place as well. If you use glue, you will need to clip the eprotruding ends of the wire flush with the bottom of the pearls or beads once the glue has dried.
Now bend this jeweled billiment so that it fits the upper curve of your hood. There should be a slight bit of the billiment beyond each point of the hood; bend this back & down slightly, like the billiments shown on the French Hood Page.
Use a dark thread between each bead to sew the billiment to the top of your hood. Alternately, you can permanently attach it with a hot glue gun. (In fact, if you have a hot glue gun, you can directly attach pretty much anything under the sun to your hood).