Most coifs, however, were very finely finished and elaborately decorated. If you want to decorate your coif, trace the pattern onto a piece of fabric and do all embroidery, blackwork, beading or other decoration before you start sewing it together. The Blackwork Archives is an excellent place to find patterns, instructions and other resources on the blackwork embroidery so popular on elizabethan coifs.
The instructions here are for the type of coif shown in The Coif Gallery: Basically, a rectangle of fabric gathered at the back of the neck and at the crown of the head. There are other types of coifs worn earlier in the 16th century, for which patterns and instructions will soon appear here as well.
To make a coif, very little is required. Simply some thread, fabric, ribbon or cord to thread through the neck gathering, and whatever decoration you wish to apply to it. When making your first coif, it's best to make one with little to no decoration on it; see how the first one fits, and experiment with the precise shape and size to create a perfectly-fitting and flattering coif before laboring hours over its decoration.
Most coifs still existing or shown in pictures were white or buff-coloured, and made out of linen. Linen is a more practical choice than silk--which is also a possibility for someone creating a costume for a noble--as it can be cleaned of sweat, grime and hair oils more easily. A fine wool challis or other wool could conceivably be used, although no evidence exists of wool being used in the 16th century as a fabric for coifs.
The fabric of a coif was usually quite fine, as fine as a woman could afford; the higher a woman's class, the finer the fabric and the more exquisitely decorated the finished item.
A peasant woman or member of the lower classes would have a coif made of white or natural linen of a rather coarse weave. The "linen-look" fabric one usually finds in fabric stores would be a good choice for a poor woman's coif.
A slightly more affluent woman would have a coif made of the equivalent of handkerchief linen; one can sometimes find this at local fabric stores for $8 to $10 a yard, but if you can't, it can be bought from many Mailorder Sources. It could be decorated with blackwork, or with a small lace or braid around the front edge.
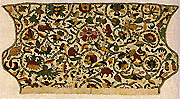
As for the nobility--as always, they're a special case. You could make a coif of white or light colored silk as well as very fine linen, or be daring and make one out of colored fabric--uncommon, but a possibility. Although the most elaborate decoration was left for the "billiments" or outer headwear, the front edge would be decorated with lace--black, white, or perhaps even metallic gold or silver. The coif itself could be embroidered with blackwork, colored embroidery, beads or spangles, all or which were used for decoration. For more pictures and information on coif decoration and embroidery, check out the Coif Gallery.
If you can't find linen, a fine cotton lawn or batiste is acceptable as a substitute, although it won't look exactly the same or have the same feel. A coif takes so little fabric--1/3 of a yard is enough for two or three--that, in my opinion at least, it's worth the cost and the effort of finding the real thing.
 Print Out
A Coif Pattern
Print Out
A Coif Pattern
*Note: Depending on how the margins on your printer are set, bits of the edge of the pattern may be cut off if you try to print it from the browser window. Either draw the missing edge in by hand, or save it to your hard drive and use a graphics program to print it out.
The above pattern is taken from a coif at the Victoria & Albert museum.
. I scaled it up, printed it
out, tried it on, and experimented with the exact size until I had
something that fit.
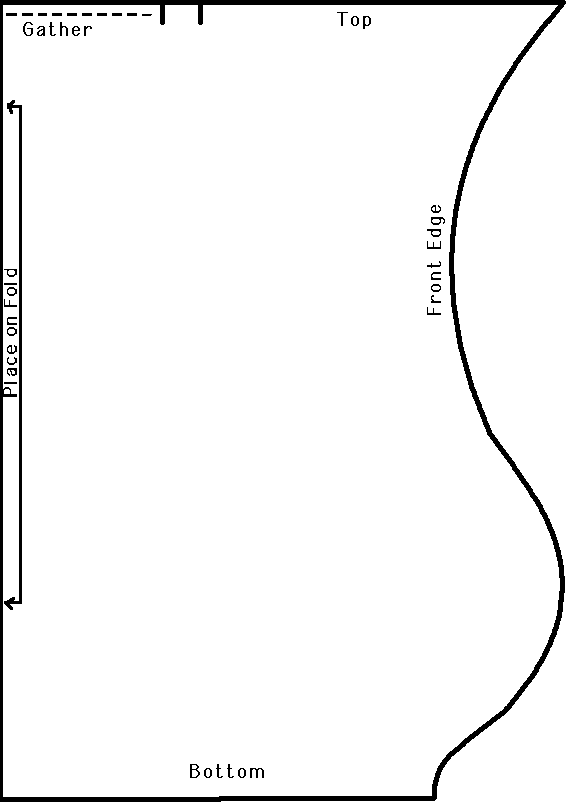
The pattern above is sized for my head, which is relatively big. (Size 22 1/2). You may wish to pare it down a bit. From bottom to top, the pattern should reach from the nape of your neck to the crown of your head; if you place the "fold" side at the back of your head, the curve should reach half an inch in front of your ear.
The curve can be adjusted, if you wish. You can scoop it out deeper, move it up or down your jawline, and make any number of changes to make it suit the shape of your face and your fancy as well. For those with long hair who plan to have it up in a bun, I recommend making the coif taller by one or two inches.
First fold your fabric in half.
Take the coif pattern, and lay it flat on the fabric you plan to use. Place the side marked "Place on Fold" againnst the fold. Place the side marked "Top" half an inch away from the selvedge edge of the fabric, if possible--it will cut down on messy inside seams.
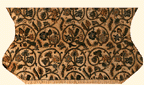
Trace around the paper pattern, using a pencil, chalk or erasable marker. Unfold the fabric, and lay the pattern piece on the unmarked half. Trace around it. When you're finished, you should have an outline similar in shape to the two coifs shown above.
Once all embroidery and other decoration has been finished on the fabric, cut the pattern out 1/2 an inch outside the traced lines.

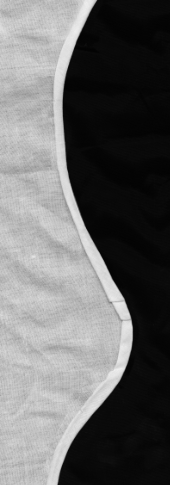 First comes the most tedious part--finishing the front edges of the coif.
Using an iron (or your fingers), lay the coif so that the outside is down,
and fold over the curved side edges towards the center of the
fabric. You want the edge of the fold to be along the traced outline of
the coif. Iron the fold so that the curved edge is smooth and flat (you
can expect some wrinkling of the folded over fabric, and will probably
have to clip the edge of the fabric to keep it from puckering too much),
then tuck the raw
end of the fabric under and hem-stitch it down with small stitches. (see
diagram to the right). You
can iron it again to make the edge as flat as possible.
First comes the most tedious part--finishing the front edges of the coif.
Using an iron (or your fingers), lay the coif so that the outside is down,
and fold over the curved side edges towards the center of the
fabric. You want the edge of the fold to be along the traced outline of
the coif. Iron the fold so that the curved edge is smooth and flat (you
can expect some wrinkling of the folded over fabric, and will probably
have to clip the edge of the fabric to keep it from puckering too much),
then tuck the raw
end of the fabric under and hem-stitch it down with small stitches. (see
diagram to the right). You
can iron it again to make the edge as flat as possible.
The next task is easier--take the rectangular portion of side "bottom" that sticks out, fold it up, tuck the edge under, and iron. Stitch the edge down to create a narrow casing.
You're mostly done! Now for side "Top"--starting five inches from one end, sew a small, even running stitch, with the stitches 1/4 an inch apart, 1/2 an inch away from the edge of the fabric all the way along the top until you're five inches away from the other end. (You can use the markings on the pattern to see where to start and end the gathering stitches.) Repeat this 1/4 inch closer to the edge. Try and make your stitches the same size, and have them go in and out of the fabric at the same places. Leave 6 extra inches of thread at the beginning and end of these stitched lines. Note: This isn't much to sew, really--and the gathering will work better if you stitch the gathering rows by hand.
 This gathering creates a coif with a slight pouf at the top back, perfect
for women who have their hair gathered into a bun at the crown of their
head. If you have short hair or want a coif that fits more closely to the
head, you can have the lines of gathering stitches dip down about an inch
and
back up again to create a smoother line. (see example to the right).
This gathering creates a coif with a slight pouf at the top back, perfect
for women who have their hair gathered into a bun at the crown of their
head. If you have short hair or want a coif that fits more closely to the
head, you can have the lines of gathering stitches dip down about an inch
and
back up again to create a smoother line. (see example to the right).
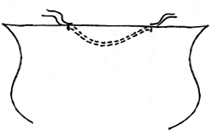
Now, with the right sides of the coif together, match the ends of the top side together, and sew them together half an inch away from the edge of the fabric. Sew all the way from the pointed end to half an inch from where the gathering stitches begin. This half-inch of space is important to make the coif lay correctly.
Take those loose threads on either
side of the gathering stitches and pull on them, gathering the rest of the
top together as tightly as you can. When finished, tie the two pairs of
threads together. 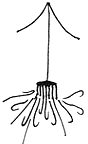 Careful not to
break them.
Careful not to
break them.
Now turn the coif right side out. You'll have a finished seam running from the point most of the way to the back, and the rest of the fabric should be gathered together with even gathers. Arrange the gathers so that the gathered edge is perpendicular to the finished seam, using the unsewn part of the seam (see diagram to the left), and sew it down using the smallest stitches possible. Clip the long, dangling theads of the gathering on the inside.
Take the raw edges of the fabric at the front of the coif and turn them under so that they don't stick out. Stitch them down.
Using a safety pin or some such, thread your ribbon or cord through the casing at the bottom of the coif. Put the coif on, and gather the bottom edge at the back of your neck until the coif fits comfortably. Voila!
Once your coif is finished, you can decorate the front edge with a narrow lace border of some kind. This lace edging is found on many extant coifs. It can come all the way up to the point, or end halfway up the face.