by Drea Leed
Constructing the Effigy Corset
The Good, the Bad & the Ugly: Notes on my reconstruction of the Effigy corset

In 1995, the effigy of Queen Elizabeth residing in Westminster Abbey was unclothed for study and repair to the garments in which she was dressed. Once the gown and hoopskirt (dating from the 17th century) were removed, the effigy's corset and drawers were visible for the first time since the 1930s.
Janet Arnold, the premier Elizabethan costume historian, spent some time examining these underpinnings. After extensive study, she pronounced them contemporary to Queen Elizabeth's death in 1603, or perhaps slightly earlier to just before the turn of the century. This is a windfall for Elizabethan costumers, as it doubles the number of extant Elizabethan corsets available for study: previously, costumers had been limited to Pfaltzgrafin Dorothea Sabine von Neuburg's pair of bodies, dated to 1598, as a source for their own corset patterns and construction methods.
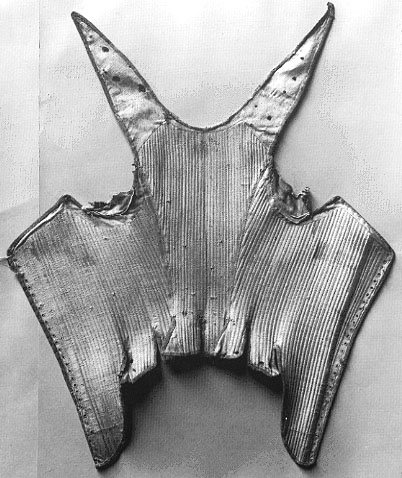
This newly-discovered pair of bodies has three sections: one back section and two front/side sections. The back section has slightly curving side back seams and two straps, wide at the base and narrowing to points, which start from the center back and radiate out at a 30 degree angle from vertical. The two front/ side sections have a flat front neckline and a scoop under each arm. The front center point is quite long and wide at the bottom, echoing the line of the current fashion for long stomachers, and the straps tie to the front of the corset just in front of the arm, creating the wide neckline necessary for these same gowns.

The corset laces up the front, with 29 small eyelets on either side, approximately 5/8 of an inch apart.
This pair of bodies is completely boned with 1/4 inch wide strips of whalebone slipped into channels between the outer fabric and lining. There are two wider strips of whalebone, a little over 1/2 inch wide at the bottom and broadening to 3/4 inch wide at the top, placed on either side of the front center opening and slanting in towards the bottom center slightly. The boning extends into the tabs, which are quite wide and about 3 inches long, and stops short a little less than an inch from the top of the corset, where a line of stitching keeps it in place.
The corset is edged with fine leather, originally apple-green in color, around the bottom, top and straps. The corset itself is made of fustian--a linen/cotton blend, woven in a twill pattern. The front and back sections appear to be finished on the back sides and whip-stitched together along these seam lines.
There are bits of linen under the arms, presumaby "sweat shields" of some sort; their precise purpose is unknown.
Once I saw the photograph of this corset and read Arnold's analysis of it, I decided to make a reproduction of my own, to see for myself how this corset pattern fit, moved and shaped the body. As I only had one photograph and one descriptive article to go on, this is by no means a definitive "reproduction". Further examination or publications on the Effigy corset may result in changes to my construction methods, next time around.
Corset Pattern:
I took my pattern off of the photograph of the effigy corset in the Westminster Abbey effigies book and scaled it up. (a drawing of the original pattern, taken from the photograph, is shown above.) As my waist is nowhere near the petite 21 inches of the original corset, I had to do some significant pattern alterations to create a corset that would fit me. Even after I had enlarged the photograph and taken two inches off of my waist and bust measurements to accommodate "squishing", I had to widen the front top to accommodate a larger bustline, broaden the back, and increase the size of the waist as well as the front length of the corset to keep everything in proportion. I kept the seam placement and the proportions of the pieces as close to the original as possible.
Materials:
As I did not have a cotton-linen fustian available, I chose to make the corset out of two layers of light but strong cream-coloured linen--somewhat sturdier than hanky linen, but not as heavy as table linen. I found some cream-coloured kidskin leather for binding the edges of the corset. The green leather from my only source bled unfortunately when exposed to moisture, and the last thing I wanted was green stripes around the waistline and sleeves of my linen undershift.
Boning:
As for the boning: whalebone, sadly, was out of the question. Artificial whalebone is available but quite expensive; so I chose, for this trial run of the Effigy corset, to use a boning material mentioned in accounts of the time and seen in surviving early 17th century stomachers: bents, or reeds with an average diameter of 2 mm. I used naturally grown broomstraw as a substitute. (Just the other day I found a place that sells 1 & 2 millimeter reeds specifically for boning: Victoria Louise, Mercers. Next time, I'll use these reeds. )
For the two wider pieces of whalebone going down the front, I used a doubled layer of ½ inch wide spring steel boning.
Construction:
I started by half-finishing the three corset sections. Placing the lining and outer fabric right sides together, I sewed the front section pieces together at the center front and the back side seams, trimmed the seams, and turned the piece right side out. I finished the back piece on the sides with the same method. The top and bottom edges of the fabric were trimmed even with the edge of the pattern, as no seam allowance was necessary.
Next, I sewed the boning channels--all 126 of them. The channels started at the bottom of the tabs, and ended 1 inch from the top of the corset. I sewed the seams by machine, as I didn't want to take overlong in creating a first trial version of the corset.
Once the boning channels were sewn, I stuffed bundles of broomstraw (4 or 5 straws in each channel) into the corset. At the center back and center front, the broomstraw had to be spliced into longer bundles and bound with thread to make bundles long enough. I boned the front edge opening, left a channel empty, and boned the one on the other side; in this empty channel the eyelets would be sewn.
Once the boning was in place I stitched across the top of the channels, leaving an approximate 1 inch strip of unboned fabric around the neckline and underarm of the corset. I also stitched about ¼ an inch from the bottom , to keep the broomstraw in place until the tabs were cut and the leather binding applied.
I then butted the finished back side edges of the front and back pieces together at the back sides, where I stitched them together with a whipstitch using heavy linen thread. Only now did I cut the tab lines to create the tabs in the bottom of the corset.

All that was left was the leather edge-binding. I took a thin strip (1 inch wide) of cream-colored kidskin, placed it ½ an inch from the edge of the front bottom of the corset, and began stitching it to the corset with linen thread. I stitched through the broomstraw and back out again. I had to stretch the leather at the top of the tabs, and gather the edges at the bottom corners of the tabs, but all in all it went smoothly once I got the hang of it.
Once the corset had the leather strip sewn to the outside, I turned it over, stretched the leather strip around the raw bottom edge, and sewed the other side of the leather strip on the inside, ½ an inch from the edge. This bound the broomstraw in so that it wouldn't poke out the bottom of the corset.
I then repeated this process on the top, which was much easier to sew as there was no broomstraw against the top edge. I sewed across the front neckline, around the armhole, up the strap and down to the center back, and did the same on the other side. Needless to say, I had to use several strips of leather; I overlapped the end of one strip with the beginning of the other and stitched through the join a couple of times when this occurred.
I finished up the corset by sewing a lacing hole at the tip of each strap and a matching hole at the outside of the neckline, just in front of the armhole. Then I sewed the lacing holes down the center front. I made all of these lacing holes by poking a hole in the corset with an awl, stretching the hole to the size I wanted, and whipstitching around the hole with heavy linen thread.
The entire process took around 15 to 20 hours. Most of this was taken up with coaxing spliced bundles of broomstraw into narrow channels and attempting to conjoin leather binding, linen fabric and broomstraw with nothing but a needle, heavy thread and a leather thimble.
Discovery #1: broomstraw shrinks corsets.
Yes, I had known this theoretically…but until now had used flat spring steel or poly plastic or hoopskirt boning to bone my corsets. When I measured the corset and found that the corset was a good two inches smaller around then it had been before I boned it, the point was really driven home.
Discovery #2: Front-lacing corsets allow no margin for error.
If I had made this discovery with a back-lacing corset, it wouldn't have been a problem; I simply would have had a wider gap between the two back edges than I'd planned. A front-closing corset, unfortunately, has no room for lacing adjustment, as does a back-lacing corset; so I had to cut the danged thing up the back, bind the back edges with leather, and make 46 more lacing holes. Now I had a front and back closing corset, and could adjust the size with the back lacing and still have the front lacing close all the way.
Discovery #3: Broomstraw stretches!
After all the work of adding back-lacing to the corset, I once again tried it on. I found, to my surprise, that after 10 minutes or so I could lace the corset so that it no longer had an inch-and-a-half gap at the waist or the top of the back (although there was a gap of about an inch and a half at the bustline). When put under pressure, the broomstraw shifts within the channels and flattens out slightly, allowing the corset to stretch ever so slightly. I laced the corset closed at the back waist and from then on could put it on and take it off with no fitting problems.
Further joys of broomstraw
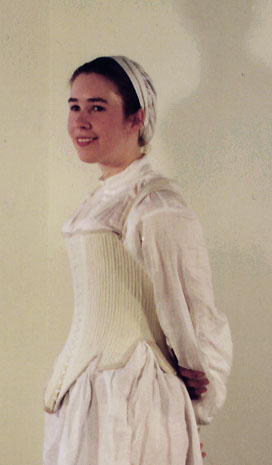
After this initial re-engineering of the corset, I found it wonderful--due, in no small part, to the boning material. I had been dubious about the support broomstraw would provide, but found it every bit as firm as poly boning (though not as firm as spring steel.). Even better, when I took the corset off after a long day's wear, the broomstraw didn't keep the curve of the tabs and front point like a corset boned with poly boning did. (Note: after a year+ of wear, the tabs have formed a permanent curve outwards and the straw has formed to the shape of my waist.)
In addition, it breathed much, much better than steel or plastic and weighed next to nothing compared to these other boning materials. It was the coolest and least noticeable corset I've ever worn. After wearing it for a day in the hot sun, the corset itself was quite damp with sweat; but I hadn't felt especially warm.
Fitting quirks and happy discoveries

After trying on the corset, I discovered another slight glitch: The back of the corset stood out from my neck when I moved my arms back, even with the straps tightly laced to the front of the corset. This was because I had taken the angle of the straps from a photograph of the corset itself. These straps were cut on the bias, and had stretched to a wider angle over time.
By narrowing the angle at which the straps diverged from the center back (read: putting a dart into the shoulder straps) and stretching them so that the points met the front lacing holes, this pulled the back closer to the neck. It still stood out slightly, but I found that this actually made some bodice patterns (which make no accomodation for any curve in towards the neck at the top of the bodice back) fit more smoothly, rather than gapping at the top back as so many unaltered bodice patterns do.
In fact, the high boned back of the corset is stiff and stable enough, and the straps tight enough, that a supportasse and open ruff could be pinned, laced or otherwise attached to it with no fear of slipping and sliding ( as can happen when an open ruff is attached to a bodice).
The straps were narrow enough in the front, and placed strategically enough that they didn't dig into my armpits when I reached forward, as every other corset with straps I've ever worn eventually seems to do. The leather edging of the straps provided some padding, and their bias cut allowed the arms and shoulders to move freely while keeping the straps firmly in place. It also made the straps conform to the outer curve of the shoulder. (The leather binding allowed this stretch, whereas a normal fabric binding would not have). The neckline created by the narrow-pointed straps tying just in front of the armpit was wide enough that this corset could be worn with all but the most wide-necked Tudor gowns. In fact, the neckline was identical to that of fashionable 1590s gowns, perhaps giving us some insight into the patterning for these gown bodices.
The two spring-steel bones down the front didn't make the corset perfectly flat (the original wasn't either), but kept it from sticking out over my abdomen while allowing me to bend forward. The wide channels for the spring steels themselves bend slightly once the corset is on, which made the bottoms of the spring steels twist inward a bit. This problem wouldn't occur with whalebone or artificial whalebone. The placement of the tabs (one directly in front and one just behind the hip) kept them from digging into my hips or over-bending the tabs when I bent sideways, as well as accentuating the curve of my waistline.
While making the corset, I didn't think much of the fact that the boning stopped an inch short of the top. Once the corset was finished, boned and worn, however, I made a happy discovery: this unboned portion flared out distinctly under the arm and at the neckline, keeping the corset bones from digging in and creating a smoother line at the bust.
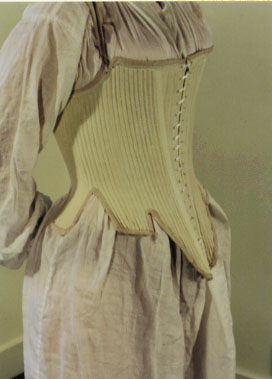
The front opening of the corset isn't a straight up-and-down line, as one would expect. It flares out slightly at the bustline, which gives a more flattering line to the corset as well as providing more support for larger bosoms and more cleavage for smaller bosoms. It creates a more curved bust, rather than the completely flat bust that a corset with a busk down the front creates.
For more pictures of this corset and the garments worn over it, check out Lady Drea's Wardrobe Unlock'd.
Other Effigy Recreations
If anyone else has made a corset based on the Effigy corset, I would be very interested in hearing their comments and about what they've learned. Please Email Me.
Home
Bibliography
Arnold, Janet. Patterns of Fashion: The Cut and Construction of Men and Women's Clothing c. 1560-1620. Pub. Drama Publishers, 1985.
Arnold, Janet. Queen Elizabeth's Wardrobe Unlock'd. Pub. W S Maney & Son, c. 1999
Harvey, Anthony. The Funeral Effigies of Westminster Abbey. Pub. Boydell & Brewer.